Welcome to Part Twelve of The Beginner’s Guide to Freediving, the best place to start your freediving journey. If you’re planning to start freediving, this chapter covers weighting yourself correctly for freediving, what sort of weighting we need for different freediving disciplines and water temperatures, plus how to set your point of neutral buoyancy for performance and safety.
How to ensure you are weighting yourself correctly for freediving
Weighting yourself correctly for freediving depends on a number of factors:
- Your weight
- Your body size and composition
- The thickness of your suit
- Whether you are diving in salt or fresh water
- The depths you will dive
Every situation will need a different approach.
One constant, however, is that we weight ourselves to be buoyant on the surface for safety reasons. Weighting yourself correctly for freediving means you need to ensure that you will stay at the surface, even after a full exhale, and if you get into trouble on your dive you want to make it as easy as possible for your buddy to rescue you and keep you at the surface.
The temperature of the water plays a big part in selecting what weight you will need. The warmer the water is, the thinner the suit you are likely to wear and, therefore, the less weight that will be needed – your wetsuit being very buoyant. On the whole, men are denser than women (insert your own pun here) and in many situations find that they either need no weight at all, or even need to add buoyancy to prevent them sinking at the surface when they exhale. In these circumstances, as part of weighting yourself correctly for freediving, freedivers often choose to still wear a weight belt, minus the weight, in order to help seal the two halves of their suit.
There are different weighting systems for freediving, but the most important consideration with all of them is to ensure that they are easy to get rid of. Any weighting system you use must be quick release, either for you or your buddy, so that you can quickly return to the surface in the event of trouble.
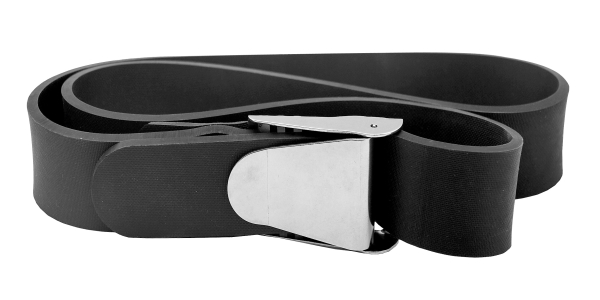
The main systems for weighting yourself correctly for freediving, used by freedivers are rubber weight belts and neck weights. Most freedivers start with a rubber weight belt fitted tightly around their hips, giving them space to breathe diaphragmatically, with small weights spaced evenly around the body.
Some freedivers then add a neck weight to help trim the body during dynamic disciplines to or create a more streamlined position during freefall in depth disciplines. Some freedivers use only a neck weight. One disadvantage of using a neck weight is that depending on the weight, it needs strong neck muscles to hold the head up when upright on the surface. Many freedivers do not like the feeling of anything impeding their ability to hold their head up.
When weighting yourself correctly for freediving, the term ‘neutrally buoyant’ refers to a balanced buoyancy where you neither float to the surface or sink down. To find out where your point of neutral buoyancy is, you will need a dive line which is marked at ten meters, or a dive line and a dive computer. Pull or fin down the line to ten meters, stop on the rope, let go and then see if you float up, sink, or remain still. If you experience the latter, this is your point of neutral buoyancy with your current weight setup. If you float or sink, return to the surface and adjust the depth or amount of weight you are wearing until you are neutrally buoyant at your desired depth.
If you are new to freediving then no-one would expect you to dive to ten meters the first time you got in the water and then hang around until you had ascertained your neutral buoyancy. So for beginners, there’s a more simple method that, while not as accurate, is easier. Firstly, put on your entire weight setup and get into the water. Then float upright in the water without finning and with your arms by your sides. You should be able to take a complete exhale with the water reaching a level between your chin and lower lip. When weighting yourself correctly for freediving, if your mouth goes under the water then you need to take weight off. If when you exhale the water does not reach your chin, you probably need to add weight.
We’ll look now at weighting for different disciplines and what to consider when weighting yourself correctly for freediving
- Static Apnea (STA) – No weight used. The body must easily float at the surface at all times.
- Dynamic Apnea with Fins (DYN) – weighting yourself correctly for freediving depends a lot on where you carry your buoyancy. Generally speaking, women carry more positive buoyancy in their bottoms and so benefit from wearing a weight belt, and men carry more positive buoyancy in their heads (no laughing at the back) so benefit from wearing a neck weight. What you want to achieve with your weighting is to be able to move your fin/s and then glide without floating to the surface or sinking to the bottom of the pool. This can take a long time experimenting to get right, and will differ if you change equipment or body composition.
- Dynamic Apnea without Fins (DNF) – The same principles apply to dynamic without fins as with fins, although it is far harder to get right. With fins you have the ability to easily correct your position in the water. With no fins, you do not have the same control or propulsion and so even the tiniest adjustment in weight can make a difference. Many top dynamic divers find that their weighting set up changes all the time and it can be the hardest part about the discipline to get right.
- Constant Weight freediving with Fins (CWT) – For safety, you should be neutrally buoyant at a depth between 10 and 12 meters when performing any dive deeper than 15 meters. The biggest risk of shallow water blackout is within the top 10 meters so it is imperative when weighting yourself correctly for freediving that you are positively buoyant from this depth. Competitive freedivers may choose to set their point of neutral buoyancy even deeper, ensuring that they can stop finning completely by the time they reach 10 meters. When people start learning to freedive, they want to wear more weight as it means that they get under the water more easily. Bad technique is no excuse for over-weighting, and effort should be made to master a correct duck dive with the right amount of buoyancy for safety.
- Constant Weight freediving without Fins (CNF) – The same principles apply to constant weight freediving without fins as do with fins, although the tendency can be to wear more weight as the initial descent is so challenging. Again, from a safety and psychological perspective, it is better to wear less weight so that the ascent is easier, especially when your limbs are burning from lactic acid build up and you are running low on oxygen.
- Recreational Freediving – If you are diving on a shallow reef then you will need to adjust your weight so that you are slightly more heavily weighted whilst still remaining positively buoyant on the surface. It can be very frustrating to be neutrally buoyant at 10 meters if the sea floor is only 4 meters and the moment you fin down, you start to bob up again. When shallow diving, you should aim to be neutrally buoyant a little shallower than the sea bottom to avoid crashing into the floor and damaging anything.
- Free Immersion Freediving – Similar to constant weight freediving, you want to be neutral from at least 10 meters. If you are only using free immersion techniques to practice equalization to shallow depths then it can be more comfortable to increase your weight so you are not struggling to keep yourself at 3 meters. In addition, if you are practicing equalization feet first, you might want to consider wearing ankle weights to help with streamlining, enabling you to focus on learning equalization rather than keeping your legs from floating up behind you.
- Variable Weight Freediving – You need no physical power to get you to depth and can benefit from a lower point of neutral buoyancy to help your ascent. Therefore no weight is worn, except maybe a weight belt with no weight to help seal your suit. Often a thicker suit is worn to aid positive buoyancy and help with the cold at depth.
- No Limits Freediving – As with variable weight freediving, you have the weighted sled to take you to depth so do not need to wear weight on your body. On the ascent the buoyancy device or lift bag will take you back to the surface, so a suit should be chosen that keeps you warm at depth and provides an extra bit of buoyancy on the ascent if the sled were to fail.
When choosing where to set your neutral buoyancy, you should also consider your buddy, their freediving ability and their confidence in potentially rescuing you. As your weighting will vary depending on many different factors, it is imperative to keep a record in your freediving log book of what weight you wore under which conditions, along with what other freediving equipment you used. It is also useful to take with you an extra half kilo weight for your belt, and neck weights of varying weight, so you can be more precise when fine-tuning your weight setup.
What is most important, though, is that you choose a weighting setup that you and your buddy are comfortable with and is always prioritizes safety.
Written by Emma Farrell
The Beginner’s Guide to Freediving is written by Emma Farrell. She is one of the world’s leading freediving instructors and has been teaching freediving since 2003. She is the author of the book ‘One Breath, a Reflection on Freediving’, has written courses that are taught worldwide, taught gold medal winning Olympic and Paralympic athletes, and has appeared numerous times on television teaching everyone from Hugh Fearnley-Whittingstall to Ellie Simmonds how to freedive.
Learn to freedive with the author of The Beginner’s Guide to Freediving
Go Freediving is the longest established, most experienced and friendliest freediving course provider in the UK, led by world class freediving instructor trainer Emma Farrell, and her team of personally trained instructors. No other course provider has such a good instructor to student ratio, safety record and personal touch.
Whether you’re a beginner dipping your toes into the world of freediving, a seasoned pro looking to turn professional, or simply a freediver of any level who wants the best freediving holiday in the world, we’re here for you!
Learn more about Freediving
Read the previous chapter of The Beginner’s Guide to Freediving – ‘Equalization for Freediving’ here now
Read the next chapter of The Beginner’s Guide to Freediving – ‘How to do the Perfect Duck Dive for Freediving’ here now.
Keep in touch with everything Freediving
Subscribe to our mailing list for weekly newsletters with exclusive articles, news, films, offers and more!
This article first appeared on Deeper Blue.com


Leave A Comment