Welcome to Part Ten of The Beginner’s Guide to Freediving, the best place to start your freediving journey. If you’re planning to start freediving, this chapter is about the importance of stretching for freediving – including stretches for the whole body and specific stretches for diaphragm flexibility.
The importance of Stretching for Freediving
The more flexible, open and relaxed your body is, the easier it will be to move through the water, equalize and avoid cramp. Stretching the body can help facilitate this. Stretching for freediving also helps to rid the muscles of lactic acid and move lymph. Many freedivers have a specific stretching routine they perform before and after a dive session; some practice yoga, and some do not do any stretching at all. Stretching for freediving is a very personal thing that should be based on your body, the conditions you find yourself in, and personal choice.
We are born with an innate flexibility that, as we grow older, can either be sustained or neglected. Some people are naturally more flexible than others, some have hyper-mobile joints, while taller people often have tighter hamstring muscles. In my teaching career, I have seen many people, mainly men, who have spent a lot of time in the gym, bulking up their muscles. In doing so, they find it very difficult for their body to move freely. Their chest does not have the flexibility to cope with compression and depth, their arms cannot be positioned above their head in a streamlined position for free immersion or using a monofin, and they are more likely to suffer from cramp in the water. If you look at gymnasts, you can see that it is possible to have both muscle strength and flexibility. One does not preclude the other.
A practice that I find to be an enormously beneficial part of stretching for freediving, is yoga. Some people are wary about the idea of yoga, believing erroneously that it means they are performing a religious act. Hatha yoga is the branch of yoga concerned with physicality of the body, strengthening and loosening it, and you do not have to subscribe to the other, more spiritual tenets of yoga to reap the benefits. The stretching exercises found in Hatha Yoga are often the same stretches found in in gyms, exercise classes and physiotherapy sessions across the world. In this article we will look at some stretches that can help prepare your body for freediving and loosen it afterwards.
Before you begin stretching for freediving, it is important that you are warm and comfortable and take it gently. Aggressive stretching on a cold wet day in a dive site car park can cause more problems than it seeks to prevent, so be sure to adapt your stretches to the environment. Again, you do not want to be lying on the floor if the floor is dirty or you are lying in a cold draft. Take into consideration the time of day and the current condition of your body. Your body will be less flexible first thing in the morning, for instance, while diaphragm stretches are best performed on a completely empty stomach. If your muscles are be sore from exercise, you have an injury or you’re recovering from illness, you must take your body’s condition into consideration.
When stretching for freediving, ensure that you listen to your body and do not try and match the teacher or the person next to you. Every body is different and stretching should benefit the body, not cause further problems. A foam mat is a cheap investment for stretching on, however you may find that you need other props such as a wall, a chair, blocks and cushions so that you can stretch in comfort. Stretches should always be done when the body is warm and, preferably, when warmed up.
Stretching for Freediving – For Aiding Equalization
Stretching the area around the Eustachian tubes helps with equalization. There are stretching for freediving exercises for the Eustachian tubes and ear drum itself, but we will cover these in the article on equalization.
- Sit or stand with your feet hip distance apart. Drop your head, resting your chin on your chest. As you inhale, roll your head towards the right hand side of your body to look over your right shoulder (do not allow the head to roll completely back). When you reach this point begin your exhalation and roll your head back down towards the center. Inhale again and this time roll your head to the left, breathing out as you roll it back down to the front. Repeat this three times to each side.
- Sit or stand with your feet hip distance apart. Look straight ahead. As you inhale, turn the head to look over one shoulder, keeping it upright and straight. As you exhale, bring it back to the center. Inhale and look over your other shoulder, exhaling back to center. Repeat this three times to each side.
- Sit or stand with your feet hip distance apart. Look straight ahead. As you inhale, drop your right ear towards your right shoulder. As you exhale, bring it back to the center. Inhale and drop your left ear towards your left shoulder, exhaling back to center. Repeat this three times to each side.
- Sit or stand with your feet hip distance apart. Drop your head, resting your chin on your chest. As you inhale, roll your head slowly back as far as is comfortable and open your mouth. Exhale, bring your head forward, chin towards the chest. Repeat this three times to each side.
Stretching for Freediving – For Shoulder and Rib Cage Flexibility
By stretching for freediving you can increase flexibility in the rib cage, which helps the body adapt to the pressure at depth. The deeper you dive, the smaller the volume of air in your lungs becomes and the more the rib cage compresses. Without adequate flexibility this can feel very uncomfortable, particularly in the sternum and throat, and can lead to lung barotrauma. Flexibility in the upper arms and shoulders helps with streamlining when the arms are above the head, the ideal position for Constant Weight No Fins (CNF) and Free Immersion (FIM) freediving. We will look at more specific stretching for freediving for monofin arm positioning in the monofin article.
- Sit or stand with your feet hip distance apart. Interlock your hands in front of you, palms outward, and press your palms away. Keep your lower back straight and your shoulders moving down. As you inhale, raise your arms above your head. Then exhale and lower your arms. Repeat for three breaths.
- Sit or stand with your feet hip distance apart. Extend your arms behind your back and interlock your fingers. As you inhale deeply, drop your chin to your chest and lift your arms away from your back at a 45 degree angle, breathing into your lungs and front of your chest. Breathe out and return to the starting position. Repeat for three breaths.
- Sit or stand with your feet hip distance apart. Extend your arms in front of you at a forty-five degree angle from your chest and interlock your fingers. As you inhale deeply, breathe into your back, particularly around the shoulders, relaxing your chin down towards your chest as you do, and rounding your back. Exhale and return to the start position. Repeat for three breaths.
- Sit or stand with your feet hip distance apart. Raise one arm straight up in the air and bend your upper body to one side. Breathe deeply into the side of the body, stretching the upper arm for thirty seconds. Repeat on the other side.
- Sitting, either on a chair or cross-legged on the floor, place your hands on your knees. As you inhale, push the front of your chest forward, arching your back, and look up. You can also open your mouth as you look up. As you exhale, round your back and bring your chin towards your chest.
- Sitting, either on a chair or cross-legged on the floor, with the spine straight, twist round to one side. Breathe continuously for 30 seconds. Take a very big breath in, and then on an exhale, twist round to the opposite side and repeat.
- Sit or stand with your feet hip distance apart. Extend your arms straight out in front of you, parallel to the floor. Place your left arm over the right at the elbows and then bring the upper arms vertical, holding onto the left wrist or hand with the right one. Keep breathing for 30 seconds as you squeeze the elbows together. If you do not feel a stretch across the back of the shoulders, raise your lower arms and move your upper arms away from the body. Bring your arms down, cross the right arm over the left and repeat on the other side.
- Sit or stand with your feet hip distance apart. Raise your left arm straight up in the air and then bend it, bringing the upper arm down with your hand moving flat behind your shoulders. If you can, bring your right arm behind your body, bending at the elbow to grasp your left hand behind your back. If this is too difficult, either hold a piece of material such as a t-shirt in your hands, or bring the right arm in front of the body and gently push your left elbow backwards. Hold for 30 seconds and then repeat on the other side.
- Sit or stand with your feet hip distance apart. Bring your left arm across your body, straight and parallel to the floor. Use your right hand to squeeze your left arm towards your body, making sure it is placed either above or below the elbow joint. Hold for 30 seconds and then repeat on the other side.
Stretching for Freediving – For Diaphragm Flexibility
The more the flexible the diaphragm is, the more easily it can rise up under the rib cage when the lungs compress at depth. This makes diving to depth easier and safer as it helps prevent lung injury. There are other, more advanced stretches for freediving that can be done, but to begin with, this diaphragm stretching for freediving exercise is very powerful.
For safety, this stretching for freediving exercise should be done on an empty stomach, bladder and bowel. Take it very gently; it is easy to injure yourself and strain your ribs and diaphragm if you do this exercise aggressively. It can also make you very lightheaded, so it is always best to practice it sitting on the edge of a chair, or cross-legged on the floor.
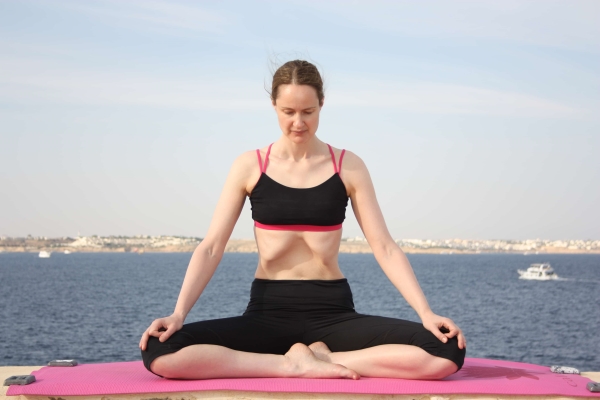
Emma Farrell in a Yoga Pose
Begin by bending forward slightly and placing your hands on the tops of your thighs for support. You can do this standing up, however your legs must be bent and you must lean forward, placing your hands on your thighs.
- Take a deep breath into your belly and then exhale all the air out of your lungs. Pull the stomach muscles in to help squeeze as much air out as possible. It will feel as if you are almost spitting out the last little bits of air. Make sure you do not accidentally inhale due to the negative pressure build up in the lungs. When there is no air left, close your mouth, shut the epiglottis (as if you are lifting a heavy weight), hold your breath and pull up your diaphragm to make a space under your ribs. If this is difficult to achieve, then imagine pulling the stomach in towards your spine and then up under the ribs. Hold this for a few seconds, and then gently release your diaphragm down, breathing deeply and gently to recover. To start with, do this no more than three times. You can slowly build up the time that you hold the stomach in, up to 30 seconds to begin with.
- The second stage to this exercise is to roll your tummy out after you have pulled it up and repeat until you stop the exercise and breathe in. You exhale everything and pull the diaphragm up as above, but then (still holding the breath), you forcibly roll the tummy forwards and out. Imagine pushing the stomach forward to give yourself a pot belly. Then pull the diaphragm in and up again, then roll out the belly. Do this rolling action a few times then relax and inhale. It is also possible to roll your tummy and make a line with the abdominal muscles that you move from side to side although the first two stages of this exercise are the most beneficial.
Stretching for Freediving – For The Lower Body
Stretching the hips and legs helps with finning and preventing cramp. Using long fins for the first time can be an adjustment for your body as you learn to use your muscles in a new way.
- Lie on the floor on your back, tucking your chin slightly in. Raise your left leg and place your foot flat on the floor about 30cm from your bottom. Do not let your leg drop out to the side of your body but keep your knee pointed at the ceiling. Lift your right leg, bend it, and with your hands hold the bent knee and gently pull it into your body. Do not strain. Breathe deeply for five breaths. Repeat on the other side of your body.
- Still lying on the floor, extend your left leg away along the floor. Lift up your right knee and hold your bent right leg towards your body. Extend your right arm out along the floor at 90 degrees to your body and, using your left hand to guide your right knee and body, move your right knee across your body towards the floor on the left hand side. Turn your head to look along your right arm. Breathe deeply for five breaths. Try to keep your right shoulder on the floor and gently encourage your right knee to move to the floor on the left side. Repeat on the other side of the body.
- Standing near a wall for support, lift up your right leg, bend your knee and bring your foot towards your bottom, stretching out the front of the right thigh. Hold your foot with your left hand, or both if you can balance. Breathe deeply for five breaths. Repeat with your left leg.
- Standing, lift your left leg a few inches off the floor in front of you and draw circles with your toes, three times clockwise and three times anticlockwise. Repeat with your right foot.
- Standing, lift your left leg a few inches off the floor in front of you and flex the foot, stretching your toes towards the front of your leg. Breathe deeply for five breaths. Repeat with the right foot.
- While standing, tilt your pelvis under and forward slightly and bend your legs a little. Reach up with your arms and then, leading with the front of your chest, move your whole body down from your hips towards the floor. Keep your back as straight as possible until it starts to bend. At this point, release the arms and neck and flop forward towards the floor. Breathe gently and deeply for five breaths. Make sure your face and arms and throat are relaxed.
The above stretches are only a guide. You can add many more stretches to your routine as you find ones that suit you, and the more the better! The most important thing is to listen to your body and not to strain.
Written by Emma Farrell
The Beginner’s Guide to Freediving is written by Emma Farrell. She is one of the world’s leading freediving instructors and has been teaching freediving since 2003. She is the author of the book ‘One Breath, a Reflection on Freediving’, has written courses that are taught worldwide, taught gold medal winning Olympic and Paralympic athletes, and has appeared numerous times on television teaching everyone from Hugh Fearnley-Whittingstall to Ellie Simmonds how to freedive.
Learn to freedive with the author of The Beginner’s Guide to Freediving
Go Freediving is the longest established, most experienced and friendliest freediving course provider in the UK, led by world class freediving instructor trainer Emma Farrell, and her team of personally trained instructors. No other course provider has such a good instructor to student ratio, safety record and personal touch.
Whether you’re a beginner dipping your toes into the world of freediving, a seasoned pro looking to turn professional, or simply a freediver of any level who wants the best freediving holiday in the world, we’re here for you!
Learn more about Freediving
Read the previous chapter of The Beginner’s Guide to Freediving – ‘The Mammalian Dive Reflex and how it helps Freedivers’ here now
Read the next chapter of The Beginner’s Guide to Freediving – ‘Equalization for Freediving’ here now.


Leave A Comment