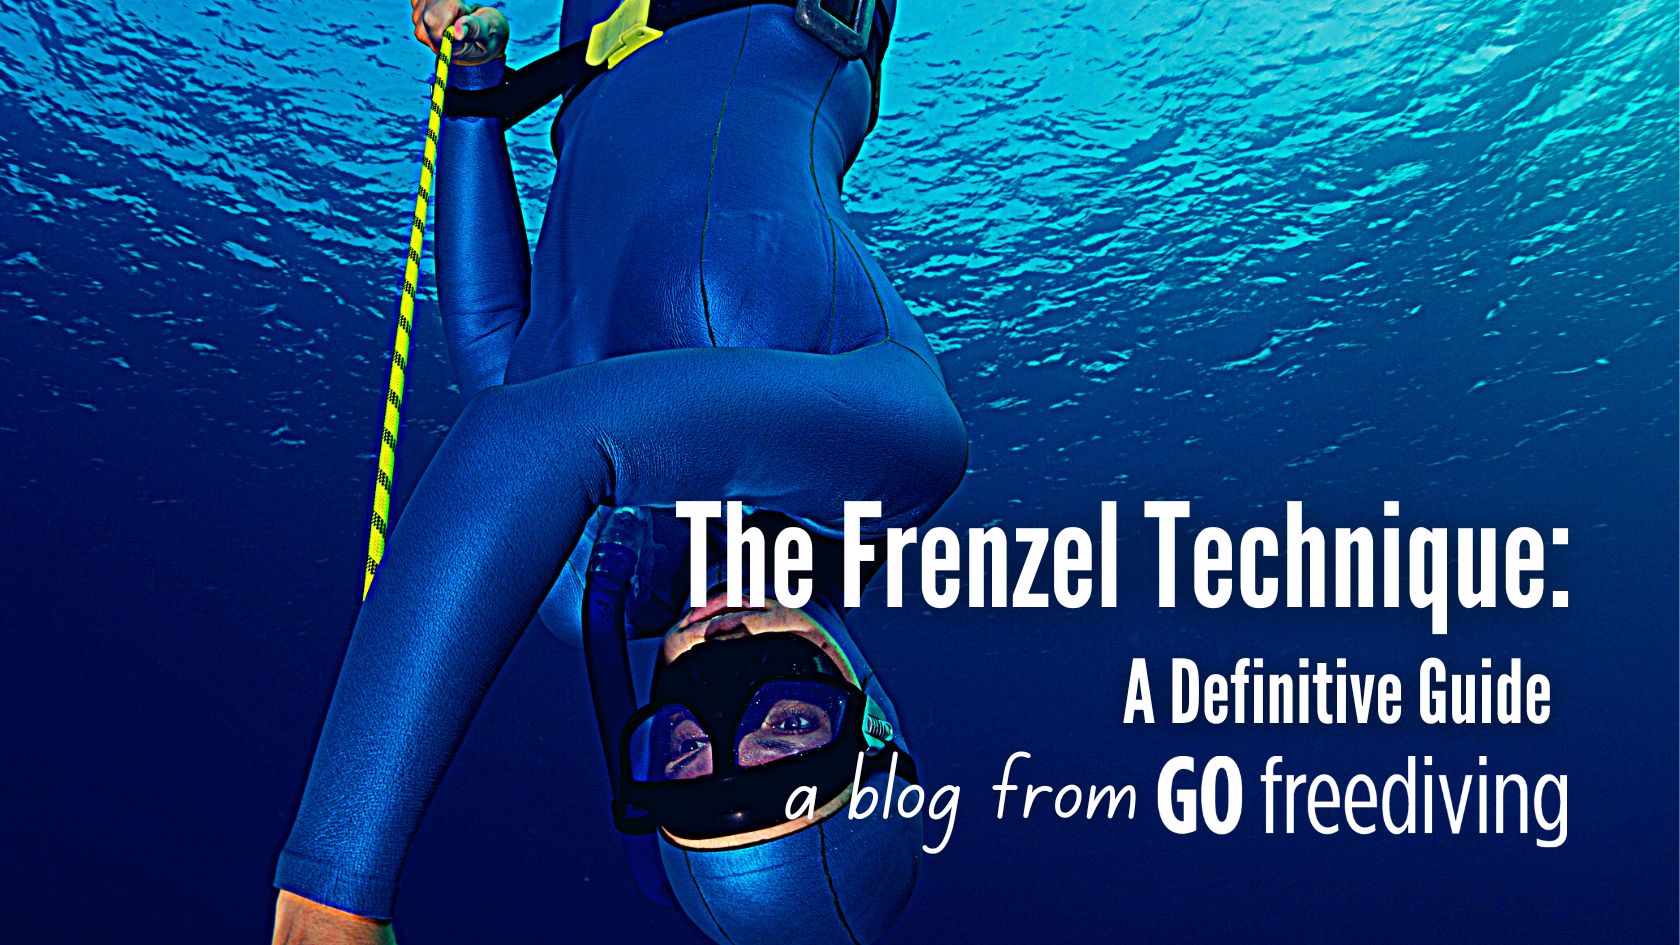
 Not a lot of people know that there is a link between the World War II German Luftwaffe and freediving, but here it is: the equalising technique practised by divers the world over was developed by Hermann Frenzel, a commander in the aforementioned air force and an ear, nose and throat specialist.
In 1938 Frenzel formulated the method which would bear his name as a means for dive bomber pilots to avoid ear pain as they descended through the skies at rapid speed. Nowadays it is the primary equalisation technique for free divers and scuba divers (as well as passengers who get that pesky stabbing in the ear when their aeroplane comes in to land).
What is ‘equalisation’?
For those completely new to freediving or scuba diving, equalisation – also known as ‘ear clearing’ – is basically an exercise where a person uses a particular method to equalise the air pressure within the middle ear and outside the ear itself. Think of when your ears sometimes ‘pop’ while yawning or swallowing, or as you ascend a steep hill in a car at relatively high speed – this is equalisation taking place, either by the physical act of the yawn or automatically as your ears ‘equalise’ while travelling up that hill. Certain techniques, such as the Frenzel, are designed to use different parts of your mouth and throat to cause air to enter the Eustachian tubes of the ear and equalise the pressure.
There are many issues that people can have with equalization for freediving. Here are some of the most common:
- Failure to equalize frequently enough – In the first 10 meters below the surface, the pressure doubles and you need to frequently equalize. I recommend you keep a hand on your nose at all times, with your elbow tucked into your body for streamlining. Pre-equalize before you leave the surface and again as soon as you have pulled your arms towards your body during the duck dive.
- Equalizing too late – Preempt every equalization. If you feel strong pressure or pain in your ears then you have left equalizing too late and it may become impossible to equalize. Always be ahead of every pressure change.
- Keeping your head raised – Tuck your head in. If you can see where you are going, then your head is raised. Tucking your head in, so it is in line with the rest of the body, takes reduces pressure on your Eustachian tubes and makes equalizing much easier.
- Equalizing only one ear – Make sure you have equalized both ears. If you have a good ear and a bad ear, it sometimes means that you equalize only one but think that you have equalized both. You then reach a depth where suddenly you are aware of intense pain. When starting to freedive, use the rope to pull down slowly. By pulling down you can stop your descent and take time to check that both ears have equalized correctly. You can also try moving your jaw forward and to each side. If you struggle equalizing your right ear, move your jaw forward and to the left to help open up the Eustachian tube on the right side, and to the right to open the left side.
- Do not strain – Equalize gently but effectively. You do not want to strain when equalizing,as this can over-pressurize your ears (in extreme cases blowing them outwards) and can cause reverse block by creating congestion in the tissues around your Eustachian tubes.
- Unable to equalize – If you cannot equalize, stop and come back to the surface. You want to avoid damaging your ears at all costs.
- Cannot equalize head first – Pulling feet first down the line can be very helpful in learning how to equalize. If this is easy, start descending at an angle, slowly moving to vertical.
Benefits of the Frenzel technique
 The Frenzel Technique greatly increases the ability of a freediver to descend deeper, while the fact that you can equalise underwater also lends a sense of safety and comfort while submerged. It can often be the difference between being a good diver and a great one, and while the technique is pretty simple in terms of what you have to do, mastering it can be tricky for many people. As with all things, practice makes all the difference and for those who learn the Frenzel and can carry it out while underwater quickly find their dives move on to a whole new – deeper – level.
It is also clear that the Frenzel equalisation technique is a more attractive method of equalising than the valsalva technique, particularly for freedivers who often need to decent at speed, because it is a more controlled method and doesn’t used the diaphragm. It is much more targeted and effective and ultimately safer (you can actually damage your ears due to the higher pressure that is created via the Valsalva technique).
A word of warning
While the Frenzel is brilliant for deeper dives, cases of pulmonary barotrauma – damage and injuries to over-pressured lungs – amongst the diving community are increasingly prevalent. This is often down to inexperienced divers using these new methods of equalisation to go deeper, faster. While they have the equalisation techniques down pat, their bodies have not yet adapted to the greater depths and this can often result in serious injury. Always remember that just because you can use the Frenzel, it doesn’t mean your body is ready to soak up the increased pressure a deep dive brings with it.
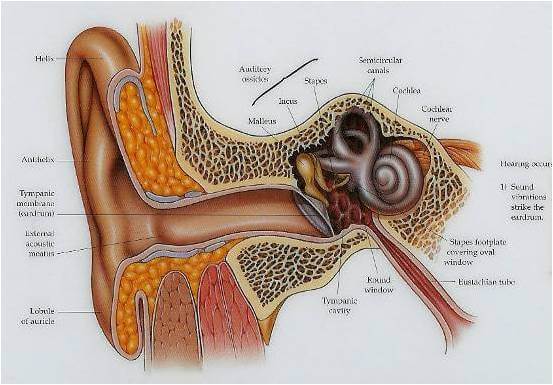
The nose, mouth and throat
 Before we move on to the actual technique, we need to learn a little bit about the human body and the various physiological aspects of the nose, mouth and throat, how they work together and how the technique affects them. All three are connected, all three essentially lead to the lungs, and all three come in to play when using the Frenzel.
First: the mouth which contains the tongue and, at the back of the mouth, the epiglottis. Both the tongue and epiglottis can be used to trap air in the lungs, or to push it through the Eustachian tubes (of which more in a second!). The main ‘tubes’ leading down from the neck into the body are the trachea and oesophagus; the trachea is the passage that leads to the lungs, while the oesophagus leads to the stomach. Both are opened and closed by the epiglottis but the trachea usually remains open (so we can breathe!), while the epiglottis is typically closed until we swallow (when it opens to allow food and drink into the stomach).
Meanwhile, at the rear upper portion of the mouth there is the soft palate, which has three positions to control the flow of air: raised, neutral and lowered. When raised it allows air to flow through the mouth to the lungs, and when lowered it is the opposite: air only flows through the nose. In neutral position the soft palate allows air to flow through both the nose and mouth.
Finally, just above the soft palate and in the nasal cavity are the openings to the Eustachian tubes. These tiny tubes link the upper section of the pharynx (also known as the nasopharynx) to the middle ear and play a crucial role in equalisation.
Performing the Frenzel
We’ve learned about the physiological side of things, now it’s time to learn how to perform the actual technique. Essentially, you will be aiming to force the air flow through the Eustachian tubes and into the middle ear, thereby ‘equalising’ the air pressure within. It is very similar to the method you would use to stop hiccups, or – as mentioned previously – ensure your ears don’t hurt during a plane’s descent, but the difference is you won’t use your diaphragm and tummy muscles to ‘push’ air up and out of your lungs – this is done entirely using the tongue, epiglottis and soft palate. Before you begin, take some deep breaths and try to relax. It might help if you practise the first few times in front of a mirror, and also with no air in your lungs so you know that you are not drawing any of it upwards. If you are on dry land remember to use a half-pinch on the nose at first.
- Gently pinch your nose closed (or half-closed if you are not submerged)
- Close the epiglottis – if done correctly you should not be able to breathe out air through your open mouth
- Close your mouth and place the tip of your tongue behind your upper front teeth
- Push the back of your tongue upwards to the roof of your mouth, as if you are making a hard ‘g’ or ‘k’ sound – you will feel the back of the tongue touch the roof
- Relax your soft palate so it is open, allowing air to travel up into the nasal cavity
- Shift the back of the tongue upwards, pushing into the airspace – you should see or feel the tendons and trachea in your neck stand out as you do this (for men it is easier to see due to the Adam’s apple)
- You should now be able to force the air through the Eustachian tubes and into the middle ears, equalising them
Here is my video, which may help explain further:
The Frenzel Technique – step by step with Eric Fattah
 Eric Fattah originally wrote the “Frenzel Fattah Equalizing Document” – one of the most comprehensive learning documents available – to explain the Frenzel technique and his strategies for equalizing well below residual lung volume (80m+).
It is believed that over ten thousand people have benefited from his guide to Frenzel and mouth-fill equalizing since being published.
As per the original document requirements, we have included it, in it’s entirety below. You are also able to download a copy for personal reference.
Part 1: Physiology
Below is a cut-through view of a human head:
- The passage that leads to the lungs is called the Trachea. It can be opened or closed by the epiglottis.
- The passage that leads to the stomach is called the Esophagus. It can be opened or closed, but it is always closed except during the act of swallowing.
- Air flowing in or out of the lungs can be directed by the soft palate. If the soft palate is in the neutral position (as shown above), then air is free to flow through both the nose and the mouth.
- If the soft palate is raised, the nasal cavity is sealed off, and air can flow only through the mouth.
- If the soft palate is lowered, the mouth is closed off, and air can flow only through the nose.
- The openings to the eustachian tubes are in the nasal cavity. The key to equalizing the ears is to force air into the eustachian tubes.
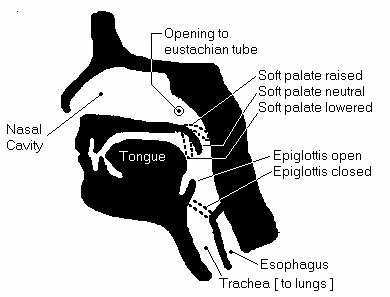
Part 2: The Frenzel Technique in Action
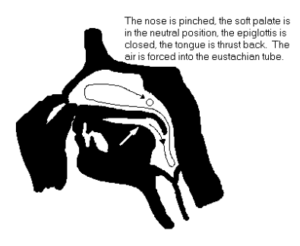
Below is a cut through view of a human head as the frenzel technique is performed:
The tongue acts as a piston; by thrusting the tongue back and up, the entire volume of the throat airspace is crushed. The air must go somewhere. It tries to go into the lungs, but the epiglottis is closed. It tries to go into the stomach, but the esophagus is closed. It tries to exit via the nose, but the nose is plugged by the fingers. The only place to go is into the eustachian tubes. The pressure of air forced into the eustachian tubes is limited only by the strength of the tongue. The tongue is incredibly strong. The tongue can provide enough air pressure to rupture the eardrums.
To perform the frenzel technique:
- Pinch your nose.
- Fill your mouth up with a little bit of air.
- Close the epiglottis.
- Move the soft palate to the neutral position.
- Use the tongue as a piston and push air towards the back of your throat.
Unfortunately, most people do not know how to control the epiglottis or the soft palate, and most people do not know how to use the tongue as a piston. The purpose of this document is to describe step-by-step procedures to learn each of the above steps. As long as each individual step is mastered, success is guaranteed.
The individual steps which must be learned can be broken down as follows:
- Learn to fill the mouth up with air
- Learn to control the epiglottis
- Learn to control the soft palate
- Learn to apply the ‘tongue block’
- Learn to use the tongue as a piston
- Learn to control the epiglottis and soft palate independently
- Put it all together
- Test it in the water
- Learn the advanced variations
Step 1: Learn to fill the mouth up with air
Fill your cheeks up like a balloon, and hold the air there for a few seconds.
Then, using your cheeks, push the air back into your lungs.
Repeat this several times, until you can do it at will.
To do a ‘complete cheek fill’, fill your cheeks until they are bursting.
To do a ‘moderate cheek fill’, fill your cheeks until they just start to bulge.
When I say ‘Fill your mouth up with a little bit of air’, I mean do a ‘moderate cheek fill.’
Step 2: Learn to control the epiglottis
There are many ways to learn to control the epiglottis:
Method 1: Gargling water or mouthwash
- Take a sip of water
- Tilt your head back, but do not allow the water to flow down your throat. Do not swallow the water.
- The water does not enter your throat because you have closed the epiglottis.
Method 2: Exhaling and stopping the air
- Open your mouth, and keep it wide open.
- Exhale, but don’t allow any air to escape.
- In other words, ‘close your throat’ and exhale against your closed throat
- No air comes out because you have closed the epiglottis
Method 3: Inhaling and stopping the air
- Open your mouth, and keep it wide open.
- Inhale, but don’t allow any air to enter your lungs
- In other words, ‘close your throat’ and inhale against your closed throat
- No air enters your lungs because you have closed the epiglottis
Method 4: Epiglottis music
- As in method 2, exhale against your closed throat. Continue to apply pressure.
- Now, for just an instant, let air through, then stop it again. It should make a funny choked noise.
- Let air out, stop it, let air out, stop it, again and again, as fast as possible.
- The muscle you are controlling is the epiglottis.
Method 5: Epiglottis music on an inhale
As in method 4, but inhale, stop the air, let it pass, stop it, let it pass.
Continue practising methods 4 & 5 until you have mastered the epiglottis.
Step 3: Learn to control the soft palate
- Close your mouth
- Inhale through your nose
- Exhale through your nose
- Inhale through your nose
- Open your mouth
- Exhale through ONLY your nose; NO AIR should come out of your mouth
- Inhale through ONLY your nose, NO AIR should flow into your mouth
- Keep breathing through your nose only, while keeping your mouth open
- Now, breathe through JUST your mouth, without any air flowing through your nose
- Once you are sure you can breathe through either your nose or mouth (keeping mouth open), proceed to the next step.
- Inhale deeply
- Open your mouth wide, and keep it wide open
- Begin exhaling SLOWLY through your MOUTH ONLY.
- Still exhaling, keeping your mouth WIDE OPEN, exhale through your NOSE ONLY
- Still exhaling, switch again, continuing to exhale through your MOUTH ONLY.
- Keep exhaling slowly, switching back and forth between nose and mouth as fast as possible.
- Try the same thing when inhaling – keep the mouth wide open, switch back and forth rapidly between inhaling through the mouth and nose
- As you switch back and forth, you will feel something soft and fleshy at the upper back of your throat moving. That is the soft palate. You raise the soft palate to breathe through your mouth, you lower the soft palate to breathe only through your nose.
- Keep repeating the above exercises until you can ‘raise’ or ‘lower’ the soft palate at will.
- When you exhale through BOTH your mouth and your nose, the soft palate is in the NEUTRAL position (neither up nor down).
Step 4: Learn to apply the ‘tongue block’
Now you must learn to stop air flow with your tongue only
- Begin exhaling through your mouth
- Stop the air flow by closing your mouth (your cheeks should fill momentarily)
- Inhale again, and begin exhaling again
- Stop the air flow by closing the epiglottis.
- So, you already know of two ways to prevent air from flowing out of your mouth—you can either close the epiglottis, or you can just close your mouth.
- Now you must learn a third way to stop the air from flowing out of your mouth.
- Inhale, and exhale slowly through your mouth, saying the syllable ‘th’ as in the word ‘theatre.’
- Now, keeping your tongue in that position, touch the tip of your tongue to the roof of your mouth, just behind your front teeth.
- Try to stop the air from flowing past your tongue, by making a seal with your tongue. The tip of your tongue touches the roof of your mouth behind your front teeth; the sides of your tongue touch the roof of your mouth just inside your molars.
- Keep repeating the above steps until you can stop air from flowing out of your mouth by using your tongue.
- Make sure you are not cheating by closing the epiglottis or closing your mouth. Your lips should remain OPEN, and your jaw will be almost closed – it can be done with the jaw totally closed, or only closed enough so that your front teeth (upper and lower) touch each other.
- Once you have mastered stopping the air with your tongue, remember what you do with your tongue—remember the position of the tongue—that is called the ‘tongue block.’
Step 5: Learn to use the tongue as a piston
- If you do not already know how to pack your lungs, refer to Appendix ‘A’
- Once you can pack your lungs easily and unconsciously, proceed to the next step.
- Find a snorkel
- Put the snorkel in your mouth
- Pinch your nose
- Pack your lungs through the snorkel
- You cannot use your cheeks to pack—it won’t work. You must use your tongue.
- In other words, suck air through the snorkel, then apply the ‘tongue block’, then raise your tongue backward, to push the air back into your throat and lungs.
- When doing this, the sides of your tongue touch your gums on the roof of your mouth, by your molars. The tip of you tongue touches the roof of your mouth. Once you have created a ‘seal’ with your tongue, all your teeth will be in the outer ‘air chamber’, and all the air behind your tongue will be in the ‘rear air chamber’. When your tongue is in this position, it is not possible to exhale. The tongue blocks the air.
- Once you can pack through your snorkel (using your tongue as described), you have mastered ‘using the tongue as a piston.’ Now you know how to push air into your lungs using your tongue.
Step 6: Learn to control the epiglottis and soft palate independently
Unfortunately, the epiglottis and soft palate are ‘coupled’, in the sense that your ears are coupled. It is hard to move one ear and not the other. It is hard to move one eyebrow and not the other. If you can move one eyebrow and not the other, then you have successfully ‘uncoupled’ those two muscles. You can control those two muscles independently. The epiglottis and soft palate are coupled. When you close the epiglottis, you almost certainly raise your soft palate (which thus prevents airflow through the nose). This is a problem. To do the frenzel technique, you must learn to close the epiglottis while keeping the soft palate in the neutral position. This can be quite difficult and time consuming to learn, and it is often the most difficult part of the entire technique.
- Place your index finger and thumb below your nostrils, so that your nose is very gently plugged.
- It should be possible to exhale through your nose—your nostrils should flare.
- Fill your cheeks up completely, until they are bursting.
- Close the epiglottis.
- Try to squeeze your cheeks and force the air OUT OF YOUR NOSE.
- You should feel the air pass over your index finger and thumb, and your nostrils should flare.
- If the air disappears and your nostrils don’t flare, the air went back into your lungs—you must not have closed the epiglottis
- If the air won’t go anywhere, and is just JAMMED, it means your soft palate is raised, which is blocking your nasal passage. Redo the soft palate exercises to gain a feeling of that muscle.
- Repeat the above steps again, concentrating on the soft palate—keep the soft palate in the NEUTRAL position! The only way you can squeeze your cheeks and force the air out of your nose is if the soft palate is in the NEUTRAL position.
- If you still cannot master the above exercise, try the following:
- Once again, pinch your nose gently.
- Exhale 90% of your air out your mouth.
- Close your mouth, and exhale the last 10% of your air into your cheeks, filling them until they are bursting.
- Close the epiglottis.
- Now your lungs should be completely empty, and your cheeks should be full. The air should be trapped in your mouth because your epiglottis is closed.
- Now, inhale against your closed throat. Of course, no air will rush into your lungs, because the epiglottis is closed. Instead, you create an uncomfortable vacuum in your lungs.
- Maintain the lung vacuum. Now try to squeeze your cheeks and force the air in your cheeks out of your nose. Concentrate on the soft palate. Relax it—keep it in the neutral position. If you succeed, the air will come rushing out of your nose. Do not let the air rush into your lungs.
- Keep practising the above exercises until you can fill your cheeks, close your epiglottis, squeeze your cheeks and force the air out of your nose. When you do that, the epiglottis is closed, and the soft palate is in the neutral position. That is the muscle state that you must remember.
Another way to learn to control the epiglottis and soft palate independently is to pack your lungs through your nose. In other words, try to learn to pack your lungs with your mouth closed. You must ‘suck’ air through your nose.
Step 7: Put it all together
- Plug your nose.
- Fill your cheeks up just a tiny bit.
- Close the epiglottis and keep the soft palate in the neutral position, as you just learned.
- Apply the tongue block, and, force the air to the back of your throat as if packing through a snorkel. The air cannot enter the lungs, but instead, it will flow into the nasal passages—but since your nose is plugged, the air will be forced into the eustachian tubes, which ‘pops’ your ears.
Once your ears have popped, you can continue to apply pressure with your tongue, bending your eardrums outward. In fact, you should feel as though you could break your own eardrums (outward), if you applied enough pressure with your tongue (of course, don’t try to break your eardrums!)
Keep practising the frenzel technique on land until you can pop your ears instantly, by plugging your nose, and ‘pop’.
Step 8: Test it in the water
- Go to a swimming pool which is at least 10 feet deep.
- Descend to 10-12 feet, upside down, without equalizing. Your ears should hurt slightly.
- Now, plug your nose and EQUALIZE! You should be able to pop your ears INSTANTLY.
- Continue applying pressure with your tongue until you feel your ears stretching outward.
- Try the same thing in a lake or ocean.
The Frenzel technique is taught and practiced on every course we teach at Go Freediving, and is something we encourage all students to study and perfect over the weeks, months and sometimes years that follow.

Practise makes perfect
The Frenzel technique is an exceptionally useful method to have in the diving armoury as it allows you to equalise as you descend. During a dive, for the first ten metres or so you will be equalising several times while upside down and travelling quickly, so getting the hang of the Frenzel is really quite important. It is safer and more controlled than other equalisation techniques (such as the Valsalva). As with most things, the technique takes time and practise to master, but once you have done it your diving will move on to a whole new level of enjoyment.
If you experience difficulty equalising, there are many things that you can do out of the water:
- Stretch the area around your Eustachian tubes
- Regularly use a neti-pot and steam inhalations to cleanse your sinuses.
- When flying, cover your nose and mouth with a layer of fabric, as it will trap moisture from your breath and help you breath in humid air.
- Use Docs Pro plugs. These are vented ear plugs that let a very small amount of water into the ear. This prevents repeated flushing of cold water on the eardrum, which can lead to exostosis, where the bone in the ear canal starts growing across the entrance. I use pro plugs even when in tropical waters and find they really help with equalization.
- As well as learning the Frenzel, aid equalization for freediving by moving your jaw forward and to the opposite side of the ear that you’re having trouble equalizing, or try wiggling your jaw and swallowing. You need to find the technique that works for you and your body.
- Make sure your ears are free of wax. If you have a lot of wax in your ears, water can get trapped behind it and become infected.
- Use a silicone barrier in your ears to prevent infection. There are now some excellent products on the market that coat your ear canal with a very thin layer of silicone. This prevents any water or dirt from attaching to your ear canal, reducing the risk of infection.
- Use an Otovent kit. This was originally developed to help children suffering from glue ear, but is used by freedivers to practice equalization for freediving. A tiny balloon is attached to a small nozzle that plugs one nostril. You inflate the balloon via this nozzle, improving your equalization technique.
- Use Buteyko method exercises to help clear your nose (more on which in a subsequent article).
- Visit a cranial osteopath and learn how to massage and loosen your sinuses.
- Keep hydrated when you freedive.
- Keep as relaxed as possible when you freedive.
- Look at your diet and work out if there are any foods and drinks that are causing congestion in your sinuses and around your Eustachian tubes. We will investigate how your diet impacts on your freediving in a later article.
- Some freedivers put a tiny bit of Vicks Vapor Rub in their nose when they freedive to help keep their sinuses free of mucous.
Further Reading:
Here are some more articles that may also help regarding equalisation:
Herbs to help with equalisation
Doc’s ProPlugs for equalisation
Beginner’s Guide to equalisation
Top ten tips for equalisation – COMING SOON!
Learn to freedive with Go Freediving
Go Freediving is the longest established, most experienced and friendliest freediving course provider in the UK, led by world class freediving instructor trainer Emma Farrell, and her team of personally trained instructors. No other course provider has such a good instructor to student ratio, safety record and personal touch.
Whether you’re a beginner dipping your toes into the world of freediving, a seasoned pro looking to turn professional, or simply a freediver of any level who wants the best freediving holiday in the world, we’re here for you!
Also check out our online guide, The Beginners Guide to Freediving by clicking here!
Want more from Go Freediving?
Scroll to the bottom of our webpage where you can sign up to our newsletter, find the dates for all upcoming trips and courses, read even more blogs, or connect with us on social media!
See you in the water!


Leave A Comment